

Matchfit + Grid Gasket Vacuum Table – a hybrid CNC hold down solution

See it in action on Instagram!
I’m a fan of the Microjig Matchfit ecosystem. It’s a clever use of dovetail slots and matching hardware for a clamping solution. I had come to appreciate their usefulness in the shop for various jig contraptions, namely table saw and router sleds, tenoning and spline jigs and anything else that needs convenient and customizable clamping without the need for additional metal t-track. I really like that you can carve the dovetail tracks into plywood or MDF on a moment’s notice.
When I discovered that a CNC spoil board can also benefit from the Matchfit treatment it upped my material hold down game. The next level arrived when I found out about the joys of using vacuum to hold things down. Now the majority of my CNC job set ups leverage vacuum instead of clamps, particularly for batch production work. However, there are times where I still need to secure material with traditional clamps, if the pieces are too small, or not smooth enough to sit on the vacuum able properly to achieve optimal suction. So reverted to using screw inserts placed strategically around the spoil board so that Ii could attach a clamp when needed.
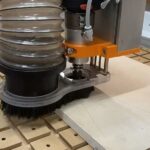
This hybrid approach worked well for a while but I knew that there had to be way to replace the screw inserts with Matchfit dovetail slots, the same way I replaced aluminum t-track. My vacuum table journey took me through several iterations of grid slot design and grid gasket material until I found the right combination. The original production table I created used 1/4” grid gasket with matching 1/4” slots for its grid. The Matchfit slots have a dovetail shape, starting with a 3/8” wide opening at the surface and flaring out 14-degrees towards the bottom. I worked with All Star CNC out west in CA, to sample their various grid gasket options. They had a 3/8” by 1/2” gasket that worked extremely well to compress into the dovetail slot, leaving enough sticking out above the surface to create a viable seal for the vacuum to suck down the material.

Now I can opt for either a vacuum hold down scenario or use a variety of Matchfit based hardware to attach clamps and other fixtures for any job. What’s great is that I can quickly create a spoil board at any size and shape, inexpensively and as needed. This gives me the best of many worlds and makes for an extremely productive and efficient workflow in my shop.
I’m releasing my initial design, a Vectric Vcarve file, to the public to share the benefits I enjoy with this discovery and so that it can evolve with others’ improvements to the design. I initially designed for and use the spoil board on my Stepcraft m.1000 desktop CNC but of course, it can be adapted for most other CNC systems. I plan on making a version for my Carbide3D Shapeoko XXL at some point too.
The Vectric VCarve project file should be relatively straightforward. If you don’t have the same m.1000 system I use, you’ll need to adjust the dimensions of the components in the design of course. I’ll run down the key elements to help you use the design and adapt it to your needs:
- To start, you’ll need to cut a piece of MDF to 30.25” x 24”. This is the material size for my particular spoil board design. I chose to only use a section of my CNC bed for the hybrid table, leaving the remaining areas with the stock sectional bed.
- I manually drill holes for the screw fittings that come with the stock table, to hold to the m.1000 frame, 3 spaced along the outer edges and 3 down the center to attach to the support rail.
- Once the spoil board is fastened to the m.1000 frame, either in the top or bottom level position, find the center to use as your project XY Datum position. Z Zero will be the surface. I do recommend surfacing your MDF board before starting the job, for best results.
- Depending on whether you have an auto tool changer or manually change tools, you’ll need to configure the appropriate tools to use for the job. Only 2 are really needed, a 1/4” end mill (downcut spiral or compression type recommended) for the slots and ports and a Matchfit 14-degree dovetail bit. Make sure you have these configured appropriately for each tool path as follows:
- Pocket Entry Holes, 1/4” downcut – these are the wider openings around the perimeter to allow inserting the Matchfit hardware for clamping.

 Drill Index Pins, 1/4” downcut – I like having these holes to use with either steel or wood dowel pins for aligning material. They also help reinforce the vacuum hold down by preventing lateral movement on those edges. This is very helpful in situations where you happen to lose vacuum accidentally or if you want to temporarily stop a job and turn off the vacuum. The index pins make sure your piece remains in the same spot as when the job started so that you can resume the job cleanly and precisely. The additional use of light clamp hold down even when using vacuum doesn’t hurt either to absolutely prevent movement when doing intricate 3D or other precise carving work, yet another inherent benefit of a hybrid table.
- Profile Dovetail Clearing, 1/4”downcut – this is the initial pass for the Matchfit grooves, to clear out most of the groove material before the dovetails are cut. It may not be necessary if your spindle and gantry are stiff and strong enough but I use it to reduce wear and tear on my bits, just like it’s recommended by Microjig when cutting Matchfit grooves the conventional way with a router or router table.
- Pocket Port Vents, 1/4” downcut – this forms a turret around the vacuum port hole to allow for efficient vacuum pass through.
- Pocket Vacuum Port, 1/4” downcut – this is the port for the the vacuum hose end. In my case, I use a Fein Turbo I for my vacuum source, which I highly recommend. So the port is sized for the rubber end of the stock hose. You MUST use a vacuum like this that has 2 motors, 1 is for the vacuum and the other for cooling. A normal shop vac lacks the second cooling motor and will likely burn out when used for this application. I use my Turbo I for extended periods of vacuum hold down time and have been for almost the last year with no complaints. You will need to adjust this port size for any other vacuum system or hose configuration.
- Profile Dovetail, Matchfit dovetail bit – this finishes the grid slots with the dovetail shape to make this hybrid table work. The Pocket Entry Holes that were created first, allow for the large end of the dovetail bit to start and end its tool paths cleanly, without having to enter or exit the MDF from the sides, and keeping the entire grid within the bounds of the MDF board.
I use 3/8″ x .500″ ; Medium Density grid gasket from https://store.allstarcnc.com/catalog/product/umg-38-500
Here are the Vectric project files (Note there’s no design difference between the VCarve & Aspire versions, and although this is design for my specific CNC, Stepcraft M.1000, it can easily be modified to fit others):
Download For VCarve & VCarve Pro
Hopefully this is enough info to get you going to make your own hybrid hold down table. Please share any and all feedback and posts when making or using your new table.
UPDATE 12/2/2025 – New layout – Now with 3″ spacing and better depth to accommodate the Matchfit CNC clamping kit
Good Luck & Enjoy!
Rod
Reference:
Some other videos showing my vacuum fixture/table journey:
First test with Rockler Vacuum Pods and Gast vacuum pump kit:
https://youtu.be/Cs5sVzWQMW0
Vacuum table prototype #1 – MDF:
https://youtu.be/vFr_z8dtCS8
More prototyping:
https://youtu.be/TQSH9S8sytl
Modular vacuum holding fixture:
https://youtu.be/pMu6hZstMgc
Using an Aluminum Grid Chuck:
https://youtu.be/Y74E4aXCFtQ
(https://www.sainsmart.com/products/cnc-aluminum-vacuum-table-for-3018prover-cnc-router)
And now the inevitable legal stuff:
Any DIY and tutorial content provided throughout the MountainMakers.com website and other assets is for informational purposes only. By taking any information or education material from Mountain Makers LLC, you assume all risks for the material covered. You agree to indemnify, hold harmless, and defend Mountain Makers, LLC from any and all claims and damages as a result of any and all of the information covered.


One Reply to “Matchfit + Grid Gasket Vacuum Table – a hybrid CNC hold down solution”
Hello.
Thanks for the detailed description. Could you please provide a DXF file or something that I can open in fusion 360? Thanks 🙂