Matchfit + Grid Gasket Vacuum Table – a hybrid CNC hold down solution

Matchfit + Grid Gasket Vacuum Table – a hybrid CNC hold down solution

See it in action on Instagram!

I’m a fan of the Microjig Matchfit ecosystem. It’s a clever use of dovetail slots and matching hardware for a clamping solution. I had come to appreciate their usefulness in the shop for various jig contraptions, namely table saw and router sleds, tenoning and spline jigs and anything else that needs convenient and customizable clamping without the need for additional metal t-track. I really like that you can carve the dovetail tracks into plywood or MDF on a moment’s notice. 

When I discovered that a CNC spoil board can also benefit from the Matchfit treatment it upped my material hold down game. The next level arrived when I found out about the joys of using vacuum to hold things down. Now the majority of my CNC job set ups leverage vacuum instead of clamps, particularly for batch production work. However, there are times where I still need to secure material with traditional clamps, if the pieces are too small, or not smooth enough to sit on the vacuum able properly to achieve optimal suction. So reverted to using screw inserts placed strategically around the spoil board so that Ii could attach a clamp when needed.

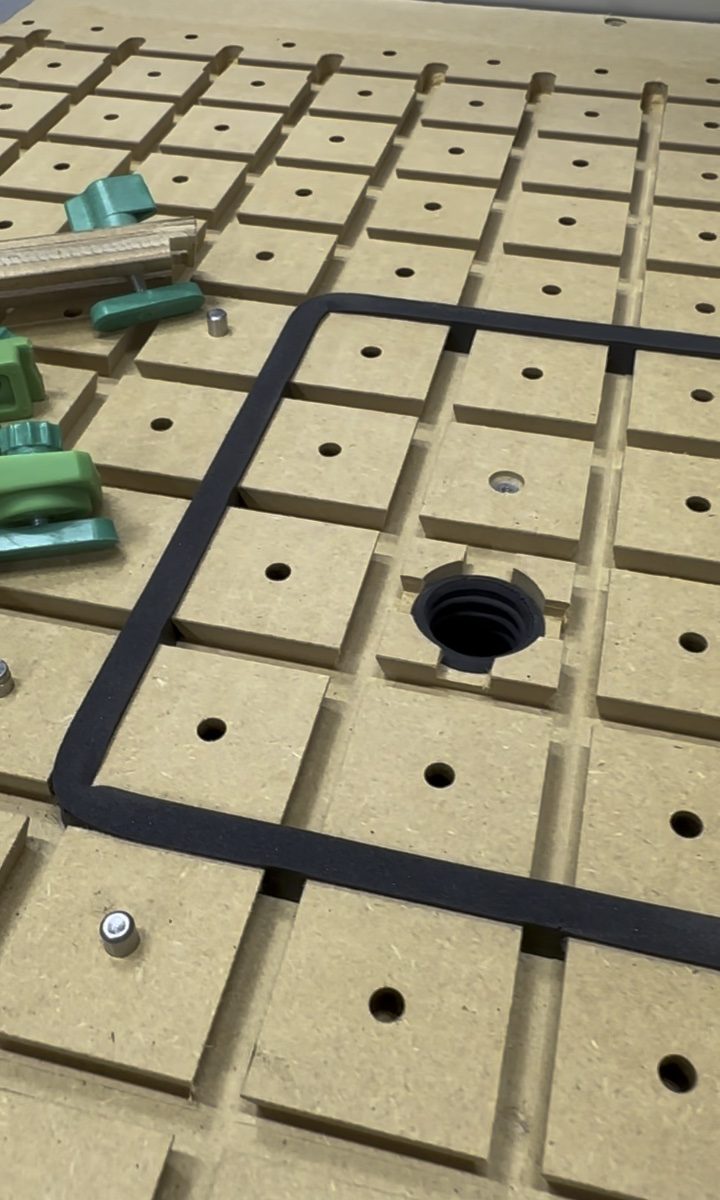
This hybrid approach worked well for a while but I knew that there had to be way to replace the screw inserts with Matchfit dovetail slots, the same way I replaced aluminum t-track. My vacuum table journey took me through several iterations of grid slot design and grid gasket material until I found the right combination. The original production table I created used 1/4” grid gasket with matching 1/4” slots for its grid. The Matchfit slots have a dovetail shape, starting with a 3/8” wide opening at the surface and flaring out 14-degrees towards the bottom. I worked with All Star CNC out west in CA, to sample their various grid gasket options. They had a 3/8” by 1/2” gasket that worked extremely well to compress into the dovetail slot, leaving enough sticking out above the surface to create a viable seal for the vacuum to suck down the material.

Now I can opt for either a vacuum hold down scenario or use a variety of Matchfit based hardware to attach clamps and other fixtures for any job. What’s great is that I can quickly create a spoil board at any size and shape, inexpensively and as needed. This gives me the best of many worlds and makes for an extremely productive and efficient workflow in my shop.

I’m releasing my initial design, a Vectric Vcarve file, to the public to share the benefits I enjoy with this discovery and so that it can evolve with others’ improvements to the design. I initially designed for and use the spoil board on my Stepcraft m.1000 desktop CNC but of course, it can be adapted for most other CNC systems. I plan on making a version for my Carbide3D Shapeoko XXL at some point too.

The Vectric VCarve project file should be relatively straightforward. If you don’t have the same m.1000 system I use, you’ll need to adjust the dimensions of the components in the design of course. I’ll run down the key elements to help you use the design and adapt it to your needs:

  1. To start, you’ll need to cut a piece of MDF to 30.25” x 24”. This is the material size for my particular spoil board design. I chose to only use a section of my CNC bed for the hybrid table, leaving the remaining areas with the stock sectional bed.
  2. I manually drill holes for the screw fittings that come with the stock table, to hold to the m.1000 frame, 3 spaced along the outer edges and 3 down the center to attach to the support rail.
  3. Once the spoil board is fastened to the m.1000 frame, either in the top or bottom level position, find the center to use as your project XY Datum position. Z Zero will be the surface. I do recommend surfacing your MDF board before starting the job, for best results.
  4. Depending on whether you have an auto tool changer or manually change tools, you’ll need to configure the appropriate tools to use for the job. Only 2 are really needed, a 1/4” end mill (downcut spiral or compression type recommended) for the slots and ports and a Matchfit 14-degree dovetail bit. Make sure you have these configured appropriately for each tool path as follows:
    • Pocket Entry Holes, 1/4” downcut – these are the wider openings around the perimeter to allow inserting the Matchfit hardware for clamping.
    • Drill Index Pins, 1/4” downcut – I like having these holes to use with either steel or wood dowel pins for aligning material. They also help reinforce the vacuum hold down by preventing lateral movement on those edges. This is very helpful in situations where you happen to lose vacuum accidentally or if you want to temporarily stop a job and turn off the vacuum. The index pins make sure your piece remains in the same spot as when the job started so that you can resume the job cleanly and precisely. The additional use of light clamp hold down even when using vacuum doesn’t hurt either to absolutely prevent movement when doing intricate 3D or other precise carving work, yet another inherent benefit of a hybrid table.
    • Profile Dovetail Clearing, 1/4”downcut – this is the initial pass for the Matchfit grooves, to clear out most of the groove material before the dovetails are cut. It may not be necessary if your spindle and gantry are stiff and strong enough but I use it to reduce wear and tear on my bits, just like it’s recommended by Microjig when cutting Matchfit grooves the conventional way with a router or router table.
    • Pocket Port Vents, 1/4” downcut – this forms a turret around the vacuum port hole to allow for efficient vacuum pass through.
    • Pocket Vacuum Port, 1/4” downcut – this is the port for the the vacuum hose end. In my case, I use a Fein Turbo I for my vacuum source, which I highly recommend. So the port is sized for the rubber end of the stock hose. You MUST use a vacuum like this that has 2 motors, 1 is for the vacuum and the other for cooling. A normal shop vac lacks the second cooling motor and will likely burn out when used for this application. I use my Turbo I for extended periods of vacuum hold down time and have been for almost the last year with no complaints. You will need to adjust this port size for any other vacuum system or hose configuration.
    • Profile Dovetail, Matchfit dovetail bit – this finishes the grid slots with the dovetail shape to make this hybrid table work. The Pocket Entry Holes that were created first, allow for the large end of the dovetail bit to start and end its tool paths cleanly, without having to enter or exit the MDF from the sides, and keeping the entire grid within the bounds of the MDF board. 

I use 3/8″ x .500″ ; Medium Density grid gasket from https://store.allstarcnc.com/catalog/product/umg-38-500

Here are the Vectric project files (Note there’s no design difference between the VCarve & Aspire versions, and although this is design for my specific CNC, Stepcraft M.1000, it can easily be modified to fit others):

Download For VCarve & VCarve Pro

Download For Aspire

Hopefully this is enough info to get you going to make your own hybrid hold down table. Please share any and all feedback and posts when making or using your new table.


Good Luck & Enjoy!

Rod

Reference:

Some other videos showing my vacuum fixture/table journey:

First test with Rockler Vacuum Pods and Gast vacuum pump kit:
https://youtu.be/Cs5sVzWQMW0

Vacuum table prototype #1 – MDF: 
https://youtu.be/vFr_z8dtCS8

More prototyping:
https://youtu.be/TQSH9S8sytl

Modular vacuum holding fixture:
https://youtu.be/pMu6hZstMgc

Using an Aluminum Grid Chuck:
https://youtu.be/Y74E4aXCFtQ

(https://www.sainsmart.com/products/cnc-aluminum-vacuum-table-for-3018prover-cnc-router)


And now the inevitable legal stuff:

Any DIY and tutorial content provided throughout the MountainMakers.com website and other assets is for informational purposes only. By taking any information or education material from Mountain Makers LLC,  you assume all risks for the material covered. You agree to indemnify, hold harmless, and defend Mountain Makers, LLC from any and all claims and damages as a result of any and all of the information covered.

Let’s Get Started… Again!

Since our original @mountain.makers Instagram account got hacked and disabled last month (around 11/17), I’ve set up a tentative new account under @themountainmakers. Hopefully this will get resolved one way or the other. In the meantime I’m considering how to continue with new posts on our new feed. So it may be a while before we gain our footing and momentum again.

Our Instagram Account is down!

I haven’t been able to get any answers from Instagram support regarding the disabling of our @mountain.makers instagram account. About a week ago, I was logged out last week after there was a notification of suspicious activity on the account and when I tried to get back in I got the notification shown below, “…for violating our terms…”!

I suspect that the account was hacked based on some clues I’ve seen with the account. In any case, dealing with any Instagram support is a nightmare since their support system is run by bots instead of any direct contact with humans. So I’m now in the painful process of jumping through hoops to restore my account, including sending a selfie with a special code and other instructions to prove I’m not a bot myself.  I’m hopeful but not confident that this will be resolved soon.

Fingers crossed!

Rod

Custom Dustboot for Stepcraft M-Series CNC Systems

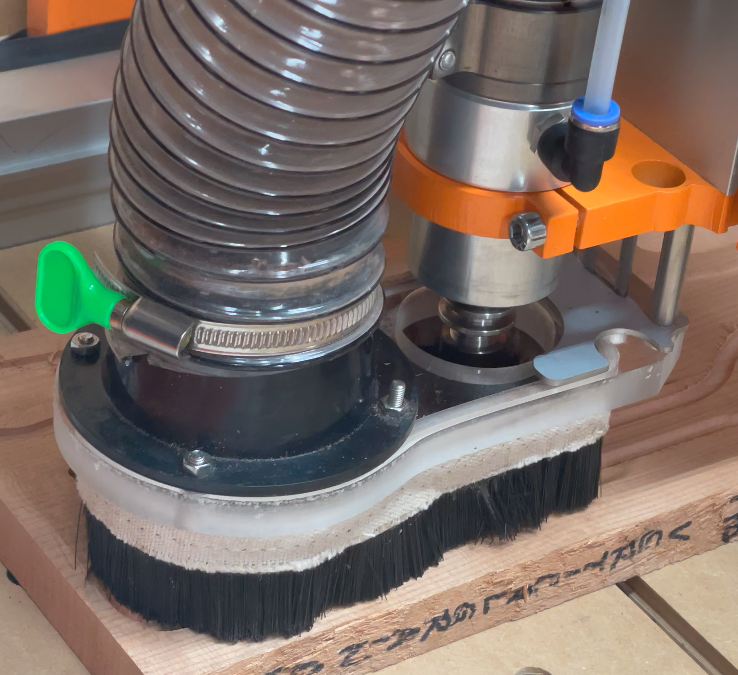
A Custom Acrylic Dust Shoe For Stepcraft M-Series CNC Systems

Updated 7/6/21

For the Stepcraft Users out there, particularly the M-Series system users with the new “ATC Tool Magazine W/ Dust Boot Control” upgrade, or even the original “Exhaust Adapter” that was originally made for the D-Series, this acrylic version provides an improvement to use a larger 2-1/2″ hose, meaning less clogging and more suction. It’s compatible with the magnetic mounting frame and works well with the pneumatic piston driven feature of the new ATC system that automatically releases the dust shoe at the start of a project and retracts it at the end, and during tool changes.

It was designed to be cut from 1/2″ cast acrylic and assembled from simple, easy to source components. I’ve provided Amazon links (affiliate links that do provide a tiny bit of commission to me just for buying through the links). Of course, you can find comparable products elsewhere but these are the actual parts I used for my own build and are known to work well.

Here are some of the Instagram posts that showcase the dust shoe in action:

https://www.instagram.com/p/CQj1nq6DAuH
https://www.instagram.com/p/CPb2pwkDWRC
https://www.instagram.com/p/CPZQf62jxGv
https://www.instagram.com/p/CPUB3usjEwT

So, let’s start with the shopping list.

NOTE: the links below are Amazon affiliate links that give me a small commission when items are purchased after clicking through the links. I use any funds for R&D (Research & Development, or Rod & Dawn, if you prefer!).

Components Required For Build  

    1. 1/2” Thick Cast Acrylic https://amzn.to/2TxCroh
    2. 2-1/2” Hose Flange https://amzn.to/3xpqgsi     ALTERNATE:  A 2-1/2” Hose Coupler (use without screws; adjust shoe port to fit) https://amzn.to/3wfIpHD
    3. 70mm Dust Shoe Brush Strip https://amzn.to/2UqfOCf
    4. M4x16 screws & M4 nuts (4 of each) https://amzn.to/2V8sXQx
    5. 10mm Rare Earth Round Button Magnets (x4 + additional 8mm magnets for reinforcement by stacking, if needed) https://amzn.to/3Ayw04Q 
    6. CA Glue & Accelerator https://amzn.to/3dPSfcJ, https://amzn.to/3wkFzksALTERNATE: HOT GLUE GUN KIT https://amzn.to/3dPSfcJ
    7. Amana Tool 51410-K Spektra Coated SC Spiral O Single Flute https://amzn.to/3dONdNI

Once you have all of the necessary parts, here’s a download link to my Vectric VCarve file. I created this in Aspire but saved as the more common VCarve (V10.5) file format for wider compatibility.

Vectric VCarve 10.5 Project File:

https://drive.google.com/file/d/12y0DQD9Iw05B1NrWi3PBOgye2hrtGbmA/view?usp=sharing


UPDATE ADDED 10/31/2022: This is a shared folder link to various 3D object files that can be used for importing to apps like Fusion 360, Shapr3D and others for additional modifications and for 3D printing!

https://drive.google.com/drive/folders/13ocdQuM7yLJDpx9t_wkv8XrmrVvpEah4?usp=sharing

The design is straightforward and only a the single end mill is used to carve the shoe from the acrylic.

NOTE: Please read through these instructions before cutting the acrylic and make sure to adjust the depth values for any of the cuts that go all the way through the material as well as the hole diameters used for the magnets. The settings in the project file were set for the parts I selected and the batch of acrylic I used. Depending on any batch variations, or if you source your acrylic and other parts somewhere else, or opt to use different parts, you may need to change various tool path dimensions and settings.

As always, be aware of the proper feeds and speeds, and adjust accordingly for your system set up and configuration.

ASSEMBLY:

For hold down during the cutting process, I used painters tape and CA glue. Once the acrylic shoe is cut out, cleaned up and ready for assembly, you’ll need to install the magnets. The magnet holes, the four surrounding the spindle opening, are designed for a snug fit with the 10mm magnets I used. Again, you may need to adjust the cut of the magnet holes to accommodate any differences in the magnets you will be using.

I recommend laying the acrylic shoe on a flat surface with the brush strip groove facing up. Then insert single 10mm magnets into each of the 4 holes so that they are flush with the top surface of the shoe. The eraser end of a pencil makes a good tool for pushing the magnets down into their holes. You can the do a test fit with the magnets in place to make sure the shoe snaps onto the metal mounting plate used with your original dust shoe. The fit of the magnets should be snug enough to hold them in place during this test fitting. The shoe should rest snugly against the metal plate and its clearance holes should allow pass through of the screw and bracket hardware attached to the plate. Once you’ve confirmed the magnets are in place, remove the shoe from the metal mounting plate. Flip the shoe upside down again and put a tiny drop of CA glue around the bottom edges of each magnet. Spray with activator to quickly bond them in place. You can strengthen the magnet force simply by stacking additional magnets within the hole, use the smaller 8mm magnets since they’ll easily pop into the holes and hold themselves in place. I’ve found that stacking a total of 3 magnets in each magnet area provides a good amount of holding strength on the mounting plate. Adjust as needed.

Next you’ll need to install the hose flange using the M4 screws and nuts installed from bottom up. A touch of thread lock is a good idea to keep the nuts from loosening during a job. As an alternative, if you don’t want to use screws and nuts to hold the flange, you could opt to use a coupler fitting, with one end clamped to your 2-1/2″ hose and the other simply inserted into the dust port opening and held snugly with just friction — For this you’ll need to modify the design to fit whatever coupler fitting you use. I may provide an alternate design file for this at some point.

Now comes the challenging part, installing the brush strip. I’ve tried numerous styles of brush strips from different vendors and ended up using the cloth backed strip since it fits snugly and provides a good amount of brush rigidity to allow the dust shoe to properly float.  If the brush strip is too flexible and the bristles are too long, the brush will bend too much and also could get in the way of the spindle and bit, which isn’t good.

You will need to use a small screwdriver or some other type of thin and flat but rigid tool to push the brush strip up into the groove that was cut in the shoe.  I recommend starting the insert of the strip at the back part of the slot, the area directly behind where the spindle will pass through. It’s hard to describe the proper technique to accomplish this but I found that a small screwdriver allowed me to slowly guide the strip into the groove as I pushed it along its outside edge, then cut to the proper length to meet your starting point.

I haven’t found a brush strip yet with the perfect length bristles. The one I recommended provides a strip that is 70mm, or 2.7″ high. This will need to be trimmed so that the overall height of the strip is about 1-3/4″. This makes sure that the bristles protruding below the acrylic boot are at the right height. You can do this either before or after the installation into the shoe depending on what you use to cut the bristles. I cut mine after installing into the shoe with a sharp pair of heavy duty scissors.

Once the brush strip is installed, you can either use CA or hot glue applied at the corner areas of the grooves. It doesn’t need a lot of glue since it should be very snug in the groove already. Apply glue or other adhesive to hole the brush strip in place at your discretion.

Once you have the brush strip installed, you just have to attach your 2-1/2″ dust hose and it should be good to go.

Now depending on the overall weight of your shoe when attached to the dust collection hose, and how the hose is supported (I suspend my dust hose with an overhead bungee cord), you may need to adjust the throttle on the new tool magazine with dust boot control for more air pressure to the piston if the release/retract action isn’t as smooth as it needs to be.

I will be updating this post to modify or improve the instructions as needed and based on feedback I receive.

I hope that this solution helps other users and I also expect it to be improved upon either with your own modifications or suggestions. I am also looking into variations of this design to:

    • work as a standalone option, without the need for the automated pneumatic hardware of the new ATC magazine, one that simply clamps to the spindle for those that don’t need ATC compatibility or the floating action.
    • work with 4″ hoses!

~Rod

And now the invevitable legal stuff:

Any DIY and tutorial content provided throughout the MountainMakers.com website and other assets is for informational purposes only. By taking any information or education material from Mountain Makers LLC,  you assume all risks for the material covered. You agree to indemnify, hold harmless, and defend Mountain Makers, LLC from any and all claims and damages as a result of any and all of the information covered.


Hello World!

Mountain Makers Leather Patch Logo Baseball Hat

If you’re reading this within a few weeks of its posting, you’re probably practicing social distancing or stay-at-home quarantine as protection from the COVID-19 outbreak. If you’re reading this further into the future, hopefully things are under control and getting back to some type of new normal. As of this post, we’re just hoping to get to the midpoint of the crisis.

While we’re waiting for some better news, it’s a good time to write some content. After all it’s just another way to make something, right?

Impressionist View
Impressionist view from our front porch

So what is Mountain Makers all about? My wife Dawn and I are makers. We live and work in the mountains of eastern Tennessee, in a valley town that sits at one of the entrances to the Great Smoky Mountains National Park. Townsend is often called “the peaceful side of the Smokies”. We can vouch for that and it’s one of the reasons we call this place our home. By the way, if you’re interested, you can check out Dawn’s personal blog at http://jadaroo.com. She did a great job of telling our Tennessee homesteading story and it should provide some background on how we got here.

Now I’ve always been a tinkerer, fixer-upper and a constantly curious person, even though I know what can happen to curious cats. Luckily, we survived our many DIY adventures. Through a lot of self-teaching, a balance of trial and error, successes and failures, I developed a keen interest for exploring creative things and technology. Along the way, I acquired “a particular set of skills” as an apparent side effect.

Over the course of some decades (yep, been around a while), my professional life provided years of learning experiences in software development, computers, video production, 3D modeling and animation, graphic design and business management.

I did my time in the corporate world, for a large technology company, at a desk, in a cubicle, surrounded by thousands of coworkers.

I am a founder and a partner at a digital marketing agency, where my ongoing role involves R&D and managing technology that our team uses to produce its creative work. I continue to do this via remote control from my mini command center (man cave) in the mountains.

Command & Control (aka Man Cave)

I thoroughly enjoy anything that requires me to solve problems or create new ideas. Being involved in a creative agency got me involved with brainstorming marketing solutions, producing visual media, then delivering that digital content using images, animation, videos or web applications.

Woodworking has always been a visceral passion, something that escalated from a lifelong hobby into a new business. It also involves problem solving and creativity, to design and make new things or to just make things better. Compared to developing software, one “feature” I’ve learned to like about woodworking is that projects have a definite end once they are delivered. When made with care, they can last generations. Sure, there can still be bugs in the woodwork, but those don’t get fixed with software updates.

I’m not ashamed to admit it. I look at tools and tech the same obsessive way. I have an addiction. Whether it’s digital or analog, hand or power tools, gadgets and jigs, software or hardware, even kitchen and garden tools, I’m hooked by anything that helps turn a creative idea into reality.

Digital shop tools
Our small but modern workshop

With all the tech and resources available today, it’s a wonderful time to be involved with a craft like woodworking, or in a broader sense, to be a maker of things. That’s the essence of Mountain Makers: we make things, mostly from wood but sometimes other stuff.

Dawn gravitates towards the more traditional tools and techniques for her craft. Her tool belt primarily consists of hand tools and some power tools. She’s also the “finisher”, responsible for the final touches and details of our work. She takes things I make and makes them look great. For us, It’s all about balancing form and functionality.

I consider myself “tool agnostic”, far from being a purist when it comes to the tools I use. I’m a firm believer in the adage of using the right tool for each task but I like to keep my tool options open. For instance, dovetail joints can be made with hand tools, a router dovetail jig, or with a CNC cutter. Having multiple tool choices is very liberating and lets creativity flow more freely.

Mountain Makers Shop View 2
Mountain Makers Shop View

Each tool has to prove its usefulness before it can take up valuable space in our small but mighty shop. We have most of the essential tools you would expect: chisels, hand saws & planes, jointer, thickness planer, table saw, miter saw, routers, band saw, drill press, lathe, etc. We recently added CNCs, a laser cutter and 3D printers to the mix. These digital tools are part of what I like to call our robot helpers. They significantly expand our creative options and give us small scale manufacturing capabilities. Domo arigato, mister roboto.

Mountain Makers Shop View 1
Another Mountain Makers Shop View

We designated 2020 as a “break-in” period for Mountain Makers. Think of it like software beta testing. After years in the making, we’re gradually releasing ourselves into the world, optimizing things and figuring out how to best run this new business. This includes understanding important things like production & manufacturing limits, material cost, and the art of estimating projects. It also gives us more time for mastering new techniques, experimenting, and prototyping ideas.

Since we managed to keep your interest this far, hopefully you’ll stay connected with us to see what comes out of our shop, whether it’s something we made, an Instagram post, or another story we have to share.

Down the road, we plan to share a shop tour, walk-throughs showcasing some of our projects, tool highlights and explaining what the heck is “wabi-sabi”.

If reading this raised more questions, you want to know something else about us or you have project collaboration in mind,  post a reply or send us a note .

That’s all for now, since makers gotta make!

Rod
Maker Chief
Mountain Makers


Let’s get started!

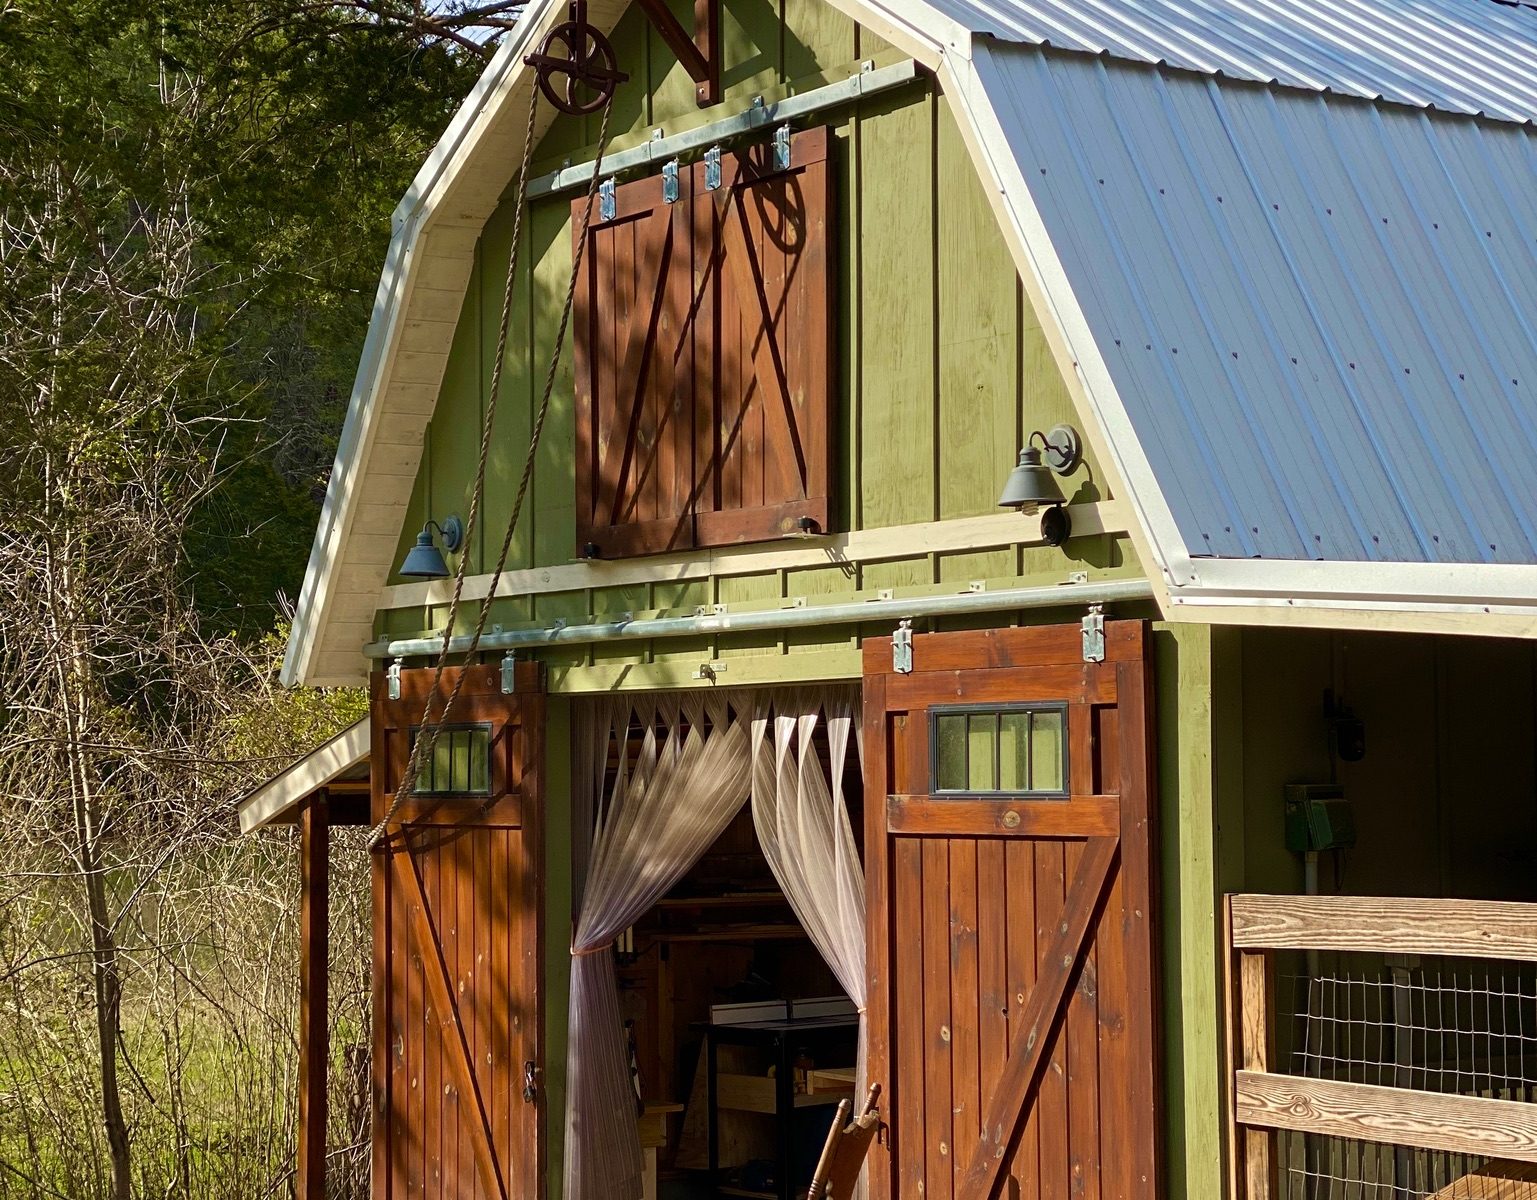
Mountain Makers Little Green Barn Opened

We wanted to be able to spend more time making things in the shop, so we’re starting with a simple web site. Over time we’ll be sharing more content like articles, images, videos and anything else we can think of to help you get to know us better.

If you want to chat, reach us via Instagram @mountain.makers or use our contact form.

In the meantime, it’s back to the shop. Maker’s gotta make!

®️