

A Custom Acrylic Dust Shoe For Stepcraft M-Series CNC Systems
Updated 7/6/21
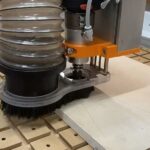
For the Stepcraft Users out there, particularly the M-Series system users with the new “ATC Tool Magazine W/ Dust Boot Control” upgrade, or even the original “Exhaust Adapter” that was originally made for the D-Series, this acrylic version provides an improvement to use a larger 2-1/2″ hose, meaning less clogging and more suction. It’s compatible with the magnetic mounting frame and works well with the pneumatic piston driven feature of the new ATC system that automatically releases the dust shoe at the start of a project and retracts it at the end, and during tool changes.
It was designed to be cut from 1/2″ cast acrylic and assembled from simple, easy to source components. I’ve provided Amazon links (affiliate links that do provide a tiny bit of commission to me just for buying through the links). Of course, you can find comparable products elsewhere but these are the actual parts I used for my own build and are known to work well.
Here are some of the Instagram posts that showcase the dust shoe in action:
https://www.instagram.com/p/CQj1nq6DAuH
https://www.instagram.com/p/CPb2pwkDWRC
https://www.instagram.com/p/CPZQf62jxGv
https://www.instagram.com/p/CPUB3usjEwT
So, let’s start with the shopping list.
NOTE: the links below are Amazon affiliate links that give me a small commission when items are purchased after clicking through the links. I use any funds for R&D (Research & Development, or Rod & Dawn, if you prefer!).
Components Required For Build
- 1/2” Thick Cast Acrylic https://amzn.to/2TxCroh
- 2-1/2” Hose Flange https://amzn.to/3xpqgsi ALTERNATE: A 2-1/2” Hose Coupler (use without screws; adjust shoe port to fit) https://amzn.to/3wfIpHD
- 70mm Dust Shoe Brush Strip https://amzn.to/2UqfOCf
- M4x16 screws & M4 nuts (4 of each) https://amzn.to/2V8sXQx
- 10mm Rare Earth Round Button Magnets (x4 + additional 8mm magnets for reinforcement by stacking, if needed) https://amzn.to/3Ayw04Q
- CA Glue & Accelerator https://amzn.to/3dPSfcJ, https://amzn.to/3wkFzks, ALTERNATE: HOT GLUE GUN KIT https://amzn.to/3dPSfcJ
- Amana Tool 51410-K Spektra Coated SC Spiral O Single Flute https://amzn.to/3dONdNI
Once you have all of the necessary parts, here’s a download link to my Vectric VCarve file. I created this in Aspire but saved as the more common VCarve (V10.5) file format for wider compatibility.
Vectric VCarve 10.5 Project File:
https://drive.google.com/file/d/12y0DQD9Iw05B1NrWi3PBOgye2hrtGbmA/view?usp=sharing
UPDATE ADDED 10/31/2022: This is a shared folder link to various 3D object files that can be used for importing to apps like Fusion 360, Shapr3D and others for additional modifications and for 3D printing!
https://drive.google.com/drive/folders/13ocdQuM7yLJDpx9t_wkv8XrmrVvpEah4?usp=sharing
The design is straightforward and only a the single end mill is used to carve the shoe from the acrylic.
NOTE: Please read through these instructions before cutting the acrylic and make sure to adjust the depth values for any of the cuts that go all the way through the material as well as the hole diameters used for the magnets. The settings in the project file were set for the parts I selected and the batch of acrylic I used. Depending on any batch variations, or if you source your acrylic and other parts somewhere else, or opt to use different parts, you may need to change various tool path dimensions and settings.
As always, be aware of the proper feeds and speeds, and adjust accordingly for your system set up and configuration.
ASSEMBLY:

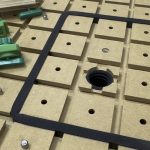
For hold down during the cutting process, I used painters tape and CA glue. Once the acrylic shoe is cut out, cleaned up and ready for assembly, you’ll need to install the magnets. The magnet holes, the four surrounding the spindle opening, are designed for a snug fit with the 10mm magnets I used. Again, you may need to adjust the cut of the magnet holes to accommodate any differences in the magnets you will be using.
I recommend laying the acrylic shoe on a flat surface with the brush strip groove facing up. Then insert single 10mm magnets into each of the 4 holes so that they are flush with the top surface of the shoe. The eraser end of a pencil makes a good tool for pushing the magnets down into their holes. You can the do a test fit with the magnets in place to make sure the shoe snaps onto the metal mounting plate used with your original dust shoe. The fit of the magnets should be snug enough to hold them in place during this test fitting. The shoe should rest snugly against the metal plate and its clearance holes should allow pass through of the screw and bracket hardware attached to the plate. Once you’ve confirmed the magnets are in place, remove the shoe from the metal mounting plate. Flip the shoe upside down again and put a tiny drop of CA glue around the bottom edges of each magnet. Spray with activator to quickly bond them in place. You can strengthen the magnet force simply by stacking additional magnets within the hole, use the smaller 8mm magnets since they’ll easily pop into the holes and hold themselves in place. I’ve found that stacking a total of 3 magnets in each magnet area provides a good amount of holding strength on the mounting plate. Adjust as needed.
Next you’ll need to install the hose flange using the M4 screws and nuts installed from bottom up. A touch of thread lock is a good idea to keep the nuts from loosening during a job. As an alternative, if you don’t want to use screws and nuts to hold the flange, you could opt to use a coupler fitting, with one end clamped to your 2-1/2″ hose and the other simply inserted into the dust port opening and held snugly with just friction — For this you’ll need to modify the design to fit whatever coupler fitting you use. I may provide an alternate design file for this at some point.
Now comes the challenging part, installing the brush strip. I’ve tried numerous styles of brush strips from different vendors and ended up using the cloth backed strip since it fits snugly and provides a good amount of brush rigidity to allow the dust shoe to properly float. If the brush strip is too flexible and the bristles are too long, the brush will bend too much and also could get in the way of the spindle and bit, which isn’t good.

You will need to use a small screwdriver or some other type of thin and flat but rigid tool to push the brush strip up into the groove that was cut in the shoe. I recommend starting the insert of the strip at the back part of the slot, the area directly behind where the spindle will pass through. It’s hard to describe the proper technique to accomplish this but I found that a small screwdriver allowed me to slowly guide the strip into the groove as I pushed it along its outside edge, then cut to the proper length to meet your starting point.
I haven’t found a brush strip yet with the perfect length bristles. The one I recommended provides a strip that is 70mm, or 2.7″ high. This will need to be trimmed so that the overall height of the strip is about 1-3/4″. This makes sure that the bristles protruding below the acrylic boot are at the right height. You can do this either before or after the installation into the shoe depending on what you use to cut the bristles. I cut mine after installing into the shoe with a sharp pair of heavy duty scissors.
Once the brush strip is installed, you can either use CA or hot glue applied at the corner areas of the grooves. It doesn’t need a lot of glue since it should be very snug in the groove already. Apply glue or other adhesive to hole the brush strip in place at your discretion.
Once you have the brush strip installed, you just have to attach your 2-1/2″ dust hose and it should be good to go.
Now depending on the overall weight of your shoe when attached to the dust collection hose, and how the hose is supported (I suspend my dust hose with an overhead bungee cord), you may need to adjust the throttle on the new tool magazine with dust boot control for more air pressure to the piston if the release/retract action isn’t as smooth as it needs to be.

I will be updating this post to modify or improve the instructions as needed and based on feedback I receive.
I hope that this solution helps other users and I also expect it to be improved upon either with your own modifications or suggestions. I am also looking into variations of this design to:
- work as a standalone option, without the need for the automated pneumatic hardware of the new ATC magazine, one that simply clamps to the spindle for those that don’t need ATC compatibility or the floating action.
- work with 4″ hoses!
~Rod
And now the invevitable legal stuff:
Any DIY and tutorial content provided throughout the MountainMakers.com website and other assets is for informational purposes only. By taking any information or education material from Mountain Makers LLC, you assume all risks for the material covered. You agree to indemnify, hold harmless, and defend Mountain Makers, LLC from any and all claims and damages as a result of any and all of the information covered.

11 Replies to “Custom Dustboot for Stepcraft M-Series CNC Systems”
I saw your video of your chimney cocktail smoker and was wondering if/how I can order one?
Will this option work if your m1000 doesn’t have the atc?
Yes, ATC isn’t required. You just need to have the dust boot accessory since the boot will fasten magnetically to the metal plate that comes with the base kit.
Rod
This is the perfect solution to one of the more baffling design decisions in the M series machines. I use Fusion 360. any chance you could upload the exported DXF file to the site. I’ll be happy to send the Fusion 360 file back your direction when I have it built up so you can share it.
Thanks!
Hi David, Thanks for the reminder. I hadn’t gotten around to doing a Fusion 360 version since I primarily use Shapr3D for modeling nowadays. The original version of the boot was just 2D designed in Vectric VCarve/Aspire. However, I just updated the post with a link to a shared folder containing various 3D files that a modeled. You should be able to use one of the files to load into Fusion 360 and do whatever tweaks you’d like to make this available to more users. Thanks for your offer to do this and I look forward to what you come up with! ~Rod
Thanks for this. I just cut the acrylic- it’s going to work great!
Glad to hear it!
Hi, do you use a pneumatic system for the up and down movement
It’s part of the ATC magazine system: https://www.stepcraft.us/shop/12370-m-1000-atc-tool-magazine-w-dust-boot-control-204045?category=62#attr=
I 3D printed your dustboot using the object files for a great fit! I found that I needed to control the path of the hose to ensure a good retraction to reliably use with my ATC. I uploaded a model of the 3D printed part that centers the hose above the shoe and also creates a little tension to increase reliability. I’ve uploaded the file here, https://makerworld.com/en/models/1452987-stepcraft-m-series-cnc-z-gantry-dust-hose-mount#profileId-1513963 in case anyone can use it. I linked to your webpage but didn’t upload any models of it. Let me know if you’d prefer a better attribution for it.
Sorry for the very delayed response!! A 3D printed version is an awesome adaptation. I’ve always wondered if that would work. Great job. I’ll check it out but in the meantime, any attribution is much appreciated!